Introduction
Sola’s Blue AI userbase will likely fall into two broad categories: programmers and casual users. Programmers can use Blue to provide an application’s framework. This is the difference between writing a term paper from scratch and editing a term paper. While users with programming experience may understand the how behind an AI-written app’s operations, casual users, myself included, often feel lost. I spent close to an hour reviewing Blue’s code from our last article—Blue AI by Sola—trying to understand the function of each line of code. In the end, I left more confused than when I started.
As someone who’s dedicated countless hours teaching themselves Zapier automations and how to program agents, understanding how to connect apps without developer ready integrations felt impossible. In this article we’ll be exploring Application Programmable Interfaces (APIs), and how they can transform your business by understanding frameworks. Understanding what we need Blue AI to build and why we need it built will yield clearer, more efficient results.
Let’s get into it!
Pricing
The free version of Blue AI provides users 2 high-level builds and 12 standard builds weekly. For new users looking to better understand Blue as a platform, the Starter Plan (Free) is more than generous. Users receive 2x the AI Build quota in the first 7 days, and it even allows the use of API keys and backups. Visit Blue AI’s Pricing page for more information.
What is an Application Programmable Interface
An API allows systems to speak to one another using requests and responses. Generally, performable actions fall into the Representational State Transfer (REST) actions:
- Get
- Post
- Put
- Delete
Using APIs permits different systems, normally generated on separate platforms, to share data without a user acting as an intermediary. Endpoints define specific URLs where resources (meaning data pieces) are accessed. Popular Customer Relationship Management (CRM) platforms like Salesforce and HubSpot provide Developer Documentation to assist users in syncing data between its own internal platform and external platforms. A HubSpot admin’s endpoint is a URL on HubSpot’s servers unique to their username and is accessed through a special token called an API key. This key uses this key to access data specific to that user’s account, then write, update, or delete information on an external platform.
This all may feel overwhelming, but understanding endpoints, access URLs, generating API keys, and modeling the app framework will help Blue build the connector tunnel for us.
Sample Python Framework for HubSpot
Below is Python code written by ChatGPT that follows the HubSpot API Documentation guidelines. The plain English explanation following the numerals (#s) are for the benefit of non-programmers to better understand what is happening at each step. To prevent confusion, please note that HubSpot now uses the term Personal Access Keys instead of API keys. Personal Access Keys can be generated under the Developer page.
# Import the requests library so Python can make HTTP calls to HubSpot.
import requests
# Store your HubSpot Private App access token.
# Create a function that accepts an email address and returns contact information.
def get_contact_by_email(email):
# Define the HubSpot endpoint used to search contact records.
url = “https://api.hubapi.com/crm/v3/objects/contacts/search”
# Create the HTTP headers required by HubSpot.
# Authorization proves who is making the request.
# Content-Type tells HubSpot we are sending JSON data.
headers = {
“Authorization”: f”Bearer {HUBSPOT_ACCESS_TOKEN}”,
“Content-Type”: “application/json”
}
# Build the search request body.
# Tell HubSpot to find a contact whose email exactly matches the supplied email address.
payload = {
“filterGroups”: [
{
“filters”: [
{
“propertyName”: “email”,
“operator”: “EQ”,
“value”: email
}
]
}
],
# Tell HubSpot which fields we want returned.
“properties”: [
“firstname”,
“lastname”,
“mobilephone”
],
# Limit the results to one contact record.
“limit”: 1
}
# Send the search request to HubSpot.
# The response is stored in the variable named response.
response = requests.post(
url,
headers=headers,
json=payload
)
# If HubSpot returns an error code, stop execution and display the error.
response.raise_for_status()
# Convert the JSON response into a Python object.
# Extract only the results list.
results = response.json().get(“results”, [])
# If no matching contacts are found, return None.
if not results:
return None
# Retrieve the properties from the first matching contact.
contact = results[0][“properties”]
# Return only the fields we care about in a clean format.
return {
“first_name”: contact.get(“firstname”),
“last_name”: contact.get(“lastname”),
“mobile_number”: contact.get(“mobilephone”)
}
# Call the function and search for a contact using an email address.
contact_info = get_contact_by_email(“jane.doe@example.com”)
# Check whether a matching contact was found.
if contact_info:
# If a contact exists, print the contact information.
print(contact_info)
else:
# If no contact exists, display a message indicating no match was found.
print(“Contact not found.”)
import requests
def get_contact_by_email(email):
url = “https://api.hubapi.com/crm/v3/objects/contacts/search”
headers = {
“Authorization”: f”Bearer {HUBSPOT_ACCESS_TOKEN}”,
“Content-Type”: “application/json”
}
payload = {
“filterGroups”: [
{
“filters”: [
{
“propertyName”: “email”,
“operator”: “EQ”,
“value”: email
}
]
}
],
“properties”: [
“firstname”,
“lastname”,
“mobilephone”
],
“limit”: 1
}
response = requests.post(
url,
headers=headers,
json=payload
)
response.raise_for_status()
results = response.json().get(“results”, [])
if not results:
return None
contact = results[0][“properties”]
return {
“first_name”: contact.get(“firstname”),
“last_name”: contact.get(“lastname”),
“mobile_number”: contact.get(“mobilephone”)
}
# Example usage
contact_info = get_contact_by_email(“jane.doe@example.com”)
if contact_info:
print(contact_info)
else:
print(“Contact not found.”)
Building Search App with Blue AI
The above-referenced Python code is for illustrative purposes to provide a line-by-line breakdown of the fetch functions. We will construct the API fetch app in Blue’s AI Build section. For users wanting to copy this HubSpot CRM data fetch app buildout, under the user profile you must navigate to Settings à Private Apps à Legacy Apps, and then create a legacy app that will then permit the user to define permissions and produce an Access token (API).
After those steps are completed, the Access token and .env naming convention title HUBSPOT_ACCESS_TOKEN can be loaded into the Integrations tab under AI Build.
The following prompt injection allowed Blue to build the exact-intended app.
[Create an app that is able to connect with HubSpot’s API fetch server: https://api.hubapi.com/crm/v3/objects/contacts/search using the API I loaded. I want this program to connect with that API key and allow me to search by email address and the app will return the user’s first and last name.]
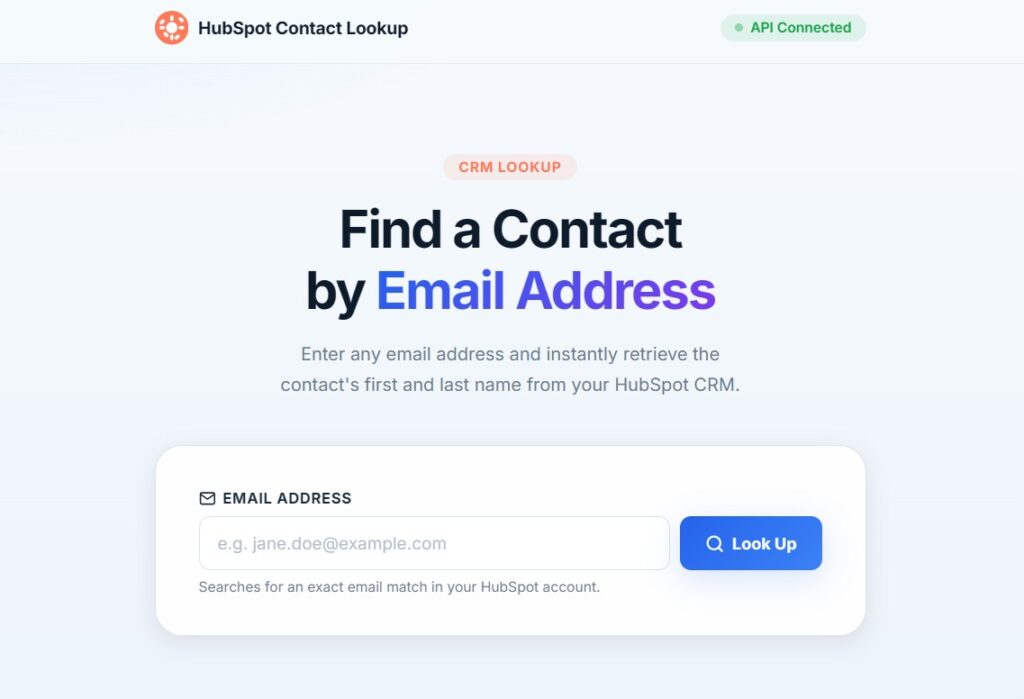
For privacy’s sake I cannot share the result, but after the build completed, the search completed without issue and produced the name of the contact associated with the queried email. I do not believe it’s possible for an app build to be simpler than telling the software what to do.
Conclusion
Blue AI continues to impress. HubSpot has specific formatting requirements for correctly fetching data. The fact Blue was able to reproduce this without any additional user input besides providing the Access token (API) is beyond impressive. In a real-world application, realistic next steps would include creating a refreshable data feed linking key data points between Hubspot and another piece of software.
As a reminder, everything performed in this article today is possible in the Starter (Free) version of Blue. Drop a comment below for any requests on future content. Thanks for reading!